Migrating to the PyPI version
Notice
Starting with version 2.0.0 the way code gets onto your computer is totally different. The files in/home/pi/PiWeatherRock will no longer be used at all once you have finished migrating.Migration is only slightly different than the new Getting Started guide.
Install Puppet Bolt (not on your Pi)
Puppet has an open source tool called Bolt that makes it easy to perform ad-hoc tasks while also offering the option to reuse all the automation people have published on the Puppet Forge. This section will show you how to get started with PiWeatherRock via Bolt and is the recommended method as I hope to use it to add even more automation as time goes on.
The first step is to install Bolt. Go to https://puppet.com/open-source/bolt/ and click the “Get Started” link that is just below the first paragraph and follow the directions on the page it takes you to.
Download and extract the Puppet module
Step two is to download a copy of the Puppet module I have created to install and manage PiWeatherRock from https://forge.puppet.com/genebean/piweatherrock. The download button is on the right side just below the “More from Puppet” heading like seen below:
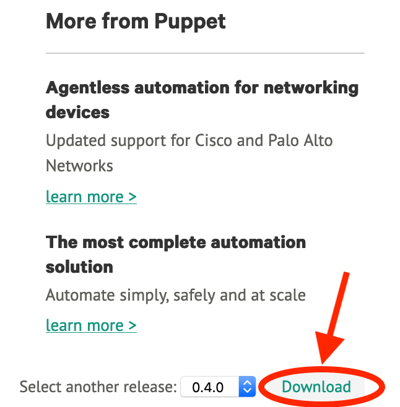
Puppet Forge May 2020
Once you have the module downloaded you will need to extract it. The file is a tarball (aka, ends in .tar.gz). Windows 10, macOS, and Linux all include a utility called tar that can be used by running these commands in a terminal:
macOS / Linux
# adjust to whereevery you downloaded the module
$ cd Downloads
$ tar -xvzf genebean-piweatherrock-*.tar.gz
Windows
# adjust to whereevery you downloaded the module
PS C:\Users\your-user-name> cd Downloads
PS C:\Users\your-user-name\Downloads> tar -xvzf genebean-piweatherrock-*.tar.gz
Windows users can also use 7-zip to extract it if needed.
This should result in a new directory named genebean-piweatherrock.
Migration
Now that Bolt is installed and the module is downloaded you can get to the part you’ve been waiting on: migrating. To do that run the commands below from your terminal. The examples below show a macOS / Linux style prompt but the commands are the same on Windows. The only difference is that in PowerShell you will need to replace the backslash ( \ ) used for line breaks with a backtick ( ` ).
The examples below makes a few assumptions:
- It assumes you named your Raspberry Pi
mylittlepi. Feel free to replace that name with whatever you actually named it. - It assumes you live in the Eastern time zone. You can find a list of time zones here.
Note: You can see what each of the flags for Bolt means by running
bolt task run --help.
$ cd genebean-piweatherrock
$ bolt task run --no-host-key-check --target mylittlepi.local \
--user pi --password-prompt --run-as root \
piweatherrock::migrate_from_git
The task that you just ran will have migrated your old config file into /home/pi/ and set its permissions. With that out of the way, let’s do the upgrade:
$ bolt task run --no-host-key-check --target mylittlepi.local \
--user pi --password-prompt --run-as root \
piweatherrock::pisetup name='mylittlepi' timezone='America/New_York'
The process you just ran will have fully patched your Pi’s operating system and ensured its hostname is set. To ensure that everything runs smoothly I suggest rebooting it at this stage. Bolt can do this for you too like so:
$ bolt task run reboot --targets mylittlepi.local --user pi \
--password-prompt --run-as root
Started on mylittlepi.local...
Finished on mylittlepi.local:
  {
    "status": "queued",
    "timeout": 3
  }
Successful on 1 target: mylittlepi.local
Ran on 1 target in 6.32 sec
You can check that the reboot has actually happened by running another bolt task like so:
$ bolt task run reboot::last_boot_time --targets mylittlepi.local --user pi \
--password-prompt --run-as root
At this point you are finished migrating. Please take note of the logging info below even if things worked well.
Logs
Currently, logging is done to a file named .log that is stored in the current directory which now equates to your home directory (aka /home/pi). The logs are viewable by going to http://mylittlepi.local:8888 again and toggling the switch at the top to “Advanced” and then scrolling to the bottom and clicking “Go to log.”
Feedback
Was this page helpful?
Glad to hear it! Please tell us how we can improve.
Sorry to hear that. Please tell us how we can improve.